Building a Monorepo using TurboRepo with React.js and Vue.js

Introduction
Today in this article, I’m going to show you in action how to install and use Turborepo with two or more different apps/frameworks running from the same monorepo with turborepo (recently acquired by vercel).
What is a Monorepo?
Well, I can not go deeper with Monorepo since there are many resources out there about this concept (recommended resource) but to simplify it to you:
Monorepo is an architectural concept which let you maintain multiple projects/apps in a single repository, many companies are using this approach particularly Google.
For example, let us say that you have the following apps:
- App 1: a main front-end app like a
blogore-commercebuilt using one of the known frameworks (e.g. React, Vue.js, Angular, Svelte, etc.) - App 2 : a server side app to handle your back-end.
- App 3 : another front-end app as a dashbaord to manage your main app (App 1).
Normally, without using the concept of Monorepos, we use a single repository for each app.
But, in one of the cases, imagine we have some code/configurations that we want to share across all of our 3 apps.
Usually, you would create an npm package to share the code/configs. But with this approach, you have to deal with versioning and you have to update all your 3 apps to get your changes.
Also, we can not share dependencies across our apps.
This is not a good approach — in my opinion — for some cases. Instead, with the concept of monorepos you can easily share code, configurations, or dependencies across all your apps and get changes instantly.
This is one of the benefits we can have using the monorepo concept.
What is Turborepo?
Regardless of what monorepos’ awesome benefits are, but if you have ever worked with them before then you know the pain of setting them up and dealing with the tools and configurations, and the really big pain is the build time it takes on every change you make. There is a lot of stuff to do.
TurboRepo came here to solve all these issues and making this much easier than before.
TurboRepo is a high-performance build system for JavaScript and TypeScript codebases. The basic principle of TurboRepo is to never recompute work that has been done before. It can boost builds speed by 85% or more, enabling teams of all sizes to maintain a fast and efficient build system that scales as codebases and teams grow.
It offers incremental builds, remote caching, parallel execution, and much more amazing features 🚀
The origin story of TurboRepo is told by Jared (the founder) in this thread:
Getting Started
We are going to build a monorepo using TurboRepo with two different apps/frameworks, one app uses React.js framework and a second app uses Vue.js framework:
- App 1: using Next.js as a React.js app.
- App 2: using Nuxt.js as a Vue.js app.
You can add more apps as you need from any other different front-end frameworks (e.g. Angular, Svelte, Remix, etc.) Or back-end frameworks such as (Nest.js, Express, Adonis.js, Sails.js, etc.)
Also, we need to create a shared packages to share UI components, one for React.js apps and another one for Vue.js apps. That could be useful if we have multiple React apps and Vue.js apps at the same time.
The apps we are going to build
We will have a simple page on both apps to display some text and a button component imported from a shared ui package. on click, it will show an alert.
Installation
Lets now install TurboRepo
npx create-turbo@latestThis command will install TurboRepo with the following files & directories:
By default, it generates 2 Next.js apps with 3 packages as showing below.
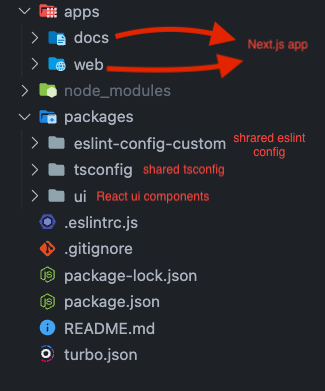
We have an apps directory, which is the place of our apps.
Also, we have a packages directory, which is the place that shares code/config to use in our apps, along with other known files and directories.
Implementation
Now, we don’t want the default apps & packages; instead, we will keep only the necessary and what we need.
Remove
node_modulesfrom the root and from any app/package, just for now.
App 1: React (Next.js) app and its ui shared package
Step 1
Since it is by default generates 2 Next.js apps, then we can remove one of the apps let’s say docs app, and rename the web app to next-app (the directory name and the name property in the package.json file of our app).
Or remove them all and create a new Next.js app by following the old apps way for configurations.
Then install tailwind
Step 2
Remove the ui package, then create a new one called react-ui with:
- a folder for components contains only one component which is
Buttom.tsx. - create
index.ts,package.json, andtsconfig.


Step 3
You also have to do some changes on next-app , change ui to react-ui in the following files:
next.config.js ,package.json , and pages/index.tsx
App 2: Vue (Nuxt.js) app and its ui shared package
Step 1
Create a Nuxt.js app called nuxt-app:
npx create-nuxt-app nuxt-appIt will prompt a questions during the installation process such as what is you package manager, etc. Select yours, and select typescript template and tailwind styling library.
After the installation process, remove node_modules just for now.
Step 2
In package.json of our Nuxt.js app, add:
nameproperty asnuxt-app.“vue-ui”:”*”todependenciesproperty (we’ll create later).“tsconfig”:”*”todevDependenciesproperty.

Step 3
Extend the TypeScript configuration from the shared tsconfig package (we’ll create later for nuxt.js). Go to tsconfig.json of your Nuxt.js app and change to the following:

Step 4
Inside packages/tsconfig, create two files (nuxtjs.json and vue-library.json) with the following configurations:


One for our Nuxt.js app (nuxtjs.json) and the other one for its shared ui package (vue-library.json).
Step 5
Create a new package called vue-ui with:
- a folder for components contains only one component which is
Button.vue. - create
index.ts,package.json,shims-vue.d.ts, andtsconfig.
shims-vue.d.tsfile helps your IDE to understand what a file ending in.vueis.


Step 6
Import and use the Button.vue component from vue-ui inside the index page or any page you have.

Running our monorepo
To run our apps and test them, we will execute npm run dev on the root of our monorepo, which is behind the scenes runs :
turbo run dev — parallelWhat TurboRepo does here is to run all our apps using their dev script in parallel.
But before that, we have one last thing to do: specify the port for each of our apps like to following:
— apps/nextapp/package.json: change dev script to next dev —-port 3000
— apps/nuxtapp/package.json: change dev script to nuxt —-port 3001
Now, you can run npm run dev at the root of the monorepo … and enjoy! 🚀
The source code:
Do not forget to take a look at my other open-source projects and give a star as a support for my work and time.
Thank you for your time, and see you again with a new articles. ⚡